A Salesforce lead is a prospective client or a potential opportunity, sometimes referred to as an “unqualified sales opportunity.” Leads can come from real-life interactions, such as meeting someone at a conference; or they can come from online interactions, such as when someone fills out a form on your website requesting more information.
Leads can be entered into Salesforce manually, through a list import, web-to-lead generation, or via an automated Salesforce.com integration with your other business software. When you convert a lead to a contact in Salesforce, the system guides you through the creation of new accounts, contacts, and opportunities. It also connects that data with the information already in its system.
Salesforce Lead Management
Salesforce maintains the integrity of your existing data to avoid overwriting any critical information. Leads can be easily managed by customizing the default settings for leads, setting up lead assignment rules that keep data flowing through the pipeline, and with information captured on forms on your website.
How to Convert a Salesforce Lead into a Contact
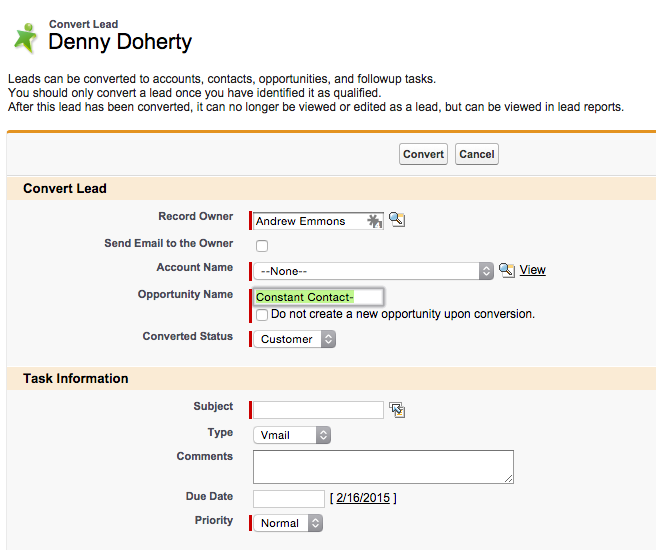
1. Find the lead you wish to convert. On the detail page for that lead, click Convert.
2. In the Account Name field, create a new account or find an existing one. Be aware that the lead conversion will preserve existing account data by default. You can opt to overwrite existing information.
3. Name the opportunity in the Opportunity Name field. You can decline to create an opportunity by checking the box.
4. In the Task Information area, schedule any follow-up tasks that may be part of your business’s workflow.
5. Click the Convert link. It’s that simple!

You can set up your Salesforce account to trigger a workflow action any time you convert a new lead. For example, this could mean that any time a lead is converted, an email is generated to your sales team urging them to get in direct contact with the person behind the lead. These automatically generated actions are recorded in Salesforce and can be viewed by building reports.
How to Assign Salesforce Leads
- • Using an assignment rule that is enacted when a lead is created or edited
- • Importing leads from existing records
- • Manual entry
- • Change of lead ownership
Opportunities are an integral part of sales management software. In Salesforce, an opportunity is a sale or pending deal. Multiple opportunities make up your sales pipeline, which contributes to your sales forecast. It’s important to keep your Salesforce opportunities updated to ensure your sales forecast is accurate.
Learn More: Are You Making the Most of Formstack’s Sales Automation Tools?
How to Create a New Salesforce Opportunity
1. In the left sidebar, choose the Create New dropdown list, then select Opportunity—or, on the opportunities home page, click New next to Recent Opportunities.
2. Next, find and view the existing account or contact. Select Opportunity from the Create New dropdown list in the sidebar. If you are doing this from a contact’s page, that contact will automatically be named as the primary contact for the opportunity.
3. Enter the information you have available for the new opportunity.
4. Review your information and ensure the proper currency is selected.
5. Click the Save button. You have just created a new opportunity!
Opportunities track all the information relating to specific sales, campaigns, and pending deals. You can easily create lists of various types, such as products, quotes, and contacts. Along with fields such as account and contact, opportunity fields can be customized. Salesforce allows you to create custom fields to track specific data that is unique to your industry, business, and customers.
Be aware that when a newly entered lead matches an existing contact and they share the same campaign, the record which is further in the lifecycle of the campaign is the one that will be maintained.
Discover how easy it can be to keep your Salesforce data updated and accessible to your sales and marketing teams by watching our Spring Cleaning Your Salesforce Org webinar. Learn how to keep your data organized, prevent duplicate Salesforce lists, and enable customers to update their own information.


